Vancouver Island
18-4970 Polkey Road
Duncan, B.C.
V9L 6W3
(250) 508-9155
This is one of the oldest DNT methods originally created to check some of the first train wheels using gear oil and talcum powder. The modern day process uses low viscosity dies to penetrate surface imperfections and reveal surface oriented defects, (also known as Visible Dye Penetrant). In the shop or field this process is typically done using aerosol canes and consists of 5 steps. First, pre-clean the surface to be tested. The client should clean test areas of slag and heavy contaminants such as grease, dirt and paint (surface must be open to the penetrants), but the technician will always preclean the test area prior to this test. Second, apply penetrants. Third, after allowing the penetrant to soak in (dwell time), completely clean the surface of penetrants and apply the developer (like an aerosol form of talcum powder). The developer draws the remaining penetrant out of any surface oriented defects. Fourth is interpretation of indications in accordance with the specification. Fifth, is post cleaning. This process is used extensively in the inspection of:

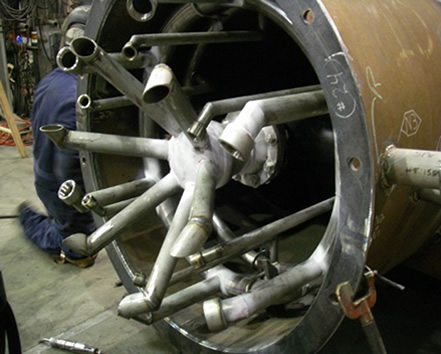
Penetrant testing on stainless Burner Nozzles
Fluorescent Liquid Penetrant: The same process as Visible Dye Penetrant except the penetrant is in a Fluorescent formulation and therefore must be viewed using a blacklight.
In this process a developer is not used but as in all fluorescent testing the inspection area must be darkened to a maximum of 15 footcandles . This is the most sensitive form of Penetrant testing.
Penetrant testing on a larger scale is done with dip tanks and drying ovens where we would test, on average, 1700 brake peddle castings a shift. In the field, large projects are things like the 18ft diameter turbine shafts, that took 24 gallons of penetrant, and the larger vessel projects you find in the resource industry.
Using high frequency sound to identify internal variations in the structure of a material. In the shop and field applications this typically consists of coupling a transducer, (a gel is applied to the surface to eliminate air between the transducer and the test surface), emitting high frequency sound to the test material. This “Ultra Sound” travels through the test material and is then used to identify any voids or discontinuities in the material.
Two basic forms of Ultrasonic testing are:

Angle Beam Testing
When you’re selling this service to a client you will find that many times their contract documents will say “Radiograghy or Ultrasonic testing required”. What you have to sell them on is the advantages of using Ultrasonics over Radiography…. which are;
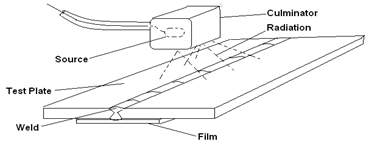
Using radioactive source to reveal internal variations in the structure of a material. Radioactive sources are generally Iridiun192, although Cobalt 60 can be used for much heavier thickness. Generally, the process consists of setting up a radioactive source at a predetermined distance from the test surface positioning the film on the other side of the test piece and exposing the test piece and the film to radiation.

Radiography Procedure
The film is then developed in a darkroom and the final image looks similar to a large negative (usually 4-1/2” x 17”).
WE ARE CERTIFIED TO DO THIS TECHNIQUE BUT WE DO NOT OFFER THIS SERVICE.
Our technicians are available for film interpretation.
Fluorescent Liquid Penetrant: The same process as Visible Dye Penetrant except the penetrant is in a Fluorescent formulation and therefore must be viewed using a blacklight.
In this process a developer is not used but as in all fluorescent testing the inspection area must be darkened to a maximum of 15 footcandles . This is the most sensitive form of Penetrant testing.
Penetrant testing on a larger scale is done with dip tanks and drying ovens where we would test, on average, 1700 brake peddle castings a shift. In the field, large projects are things like the 18ft diameter turbine shafts, that took 24 gallons of penetrant, and the larger vessel projects you find in the resource industry.
Industrial Coatings Inspection is the inspection of surface preparation, paint application, dry film thickness surveys and monitoring of environmental conditions prior to, during application and through the curing stages of the coating system(paint). Industrial paints have come a long way since their inception after the first world war. Now industrial coatings can protect surfaces against damage caused from exposure to chemicals, sea water, extreme heat, abrasion and the effects of the suns UV. The problem is that now these paints have very stringent requirements for application. Anchor profile, surface cleanliness, air temperature, substrate temperature and dew point are all critical to achieving an effective coating system. If industrial paint is applied without regard for just one of the above criteria, failures can be catastrophic. I’ve seen pin-point corrosion breach a vessel in half the time it would have taken if they hadn’t painted it at all. Simply because it was painted without consideration for the above noted criteria.
The tools involved in this type of inspection are either a wheeling sycrometer (manual) or digital. This tells you air temperature, dew point and wet and dry bulb temperatures. Surface temperature gages or infrared surface gage. Profile gage which tells you the depth of the surface profile created by abrasive blasting (sand blasting). Film thickness gages to measure dry film thickness of the paint after it’s dried. And finally, a Holiday Tester which is an instrument to identify and located any pinholes in the applied coating. The reason I’m mentioning these instruments is because when you are trying to sell this service, I can almost guarantee that one of the above instruments will come up in the discussion and you will be expected to know what it is and what it’s used for. Sometimes you will be selling this service to a painting contractor and the service should be sold on the common sense that would be applied to the specification requirements by the inspector. When selling this service to a steel contractor who is hiring a painting company, the focus of the sale should be on the coordination skills of the inspector to ensure the coating application is done right, and within the schedule dictated by the steel fabricator. When selling this service to the end user or the owner you must sell the service on the extensive experience and the ability of the inspector to maintain the highest level of quality and yet keep the job on track and schedule.
Magnified view of a grit blasted surface
Visual inspection of welding for size, location and quality in accordance with project specifications and a variety of codes. In the field or shop this service consists of just about anything the client wants. I have done everything from welding supervision to corrosion surveys on large ocean-going tankers. From weld surveys in nuclear generation stations to inspecting the roof attachment points on the Holland Tunnel (under the St Clair River in Windsor Ont. One of the nastiest places I’ve ever had to go). Usually, the only reason a steel fabricator will require this service is because he’s being forced to by his project specification.
This is much more a service to market to engineering firms which are looking for someone to do all the dirty work, so they don’t have to. I have asked Darrell to bring the engineer in to market the big engineering firms but this is a service you should always push to outfits like BC Ferries, Public Works and any of the municipalities, sewage treatment plants and all the procurement bodies with the provincial and federal governments. Always talk about the fact that bringing in a third-party inspection company distances the client from any of the liability inherent in any project, large or small. It is always useful to be knowledgeable about the history and experience of your inspectors when marketing the Visual Inspection Service. Clients want to know that the inspectors their hiring are not only certified but also have the experience on their specific type of work.
Full crane structural inspection in accordance with Work Safe BC OHSR, (occupational health and safety regulations), complete with engineering certification.
Welding procedures, crane certification, repair procedures and project supervision.
You should be familiar with the codes in this list to at least the degree of knowing generally what subject they pertain to.
Our technicians are fully certified to: